How I will vibe code as an analyst in 2026
Introduction
2025 was a year of significant development. I immersed myself in various projects, heavily leveraging AI-assisted tools, and launched a series of articles dedicated to helping aspiring AI consultants, including myself, master the field.
I also narrowed my technology focus, establishing the following stack: Django for the backend, FastAPI for all API needs, and either HTMX for simple UIs or Vue.js for more complex interfaces. This foundation sets the stage for a major theme this year, and this article outlines precisely how I plan to approach “vibe coding” as an Analyst in 2026.
My Main Tool
VS Code
After trying out several different IDEs, I’ve decided to make VS Code my permanent home for coding. It has evolved so much lately, and with all the new features added just this year (related podcast), it feels like it’s only going to get better from here. These days in Github Copilot I mostly use Claude Haiku 4.5 because it’s incredibly affordable and it explains to me the steps it does. But I’m also planning to put Gemini Flash to the test soon to see how it compares.
Using VS Code
There are many articles written about using VS Code. I will focus here in one aspect only, how to go back in time.
You will eventually mess things up! But don’t worry because you can just go back in time and start over. The combination of Git and VS Code is a developer’s best friend. Git is your friend and the secret is to commit your work often; by building a detailed trail of small, clear changes, you ensure that you always have a safe point to return to.
If something does go wrong, you have two powerful tools at your disposal: Git reset and Git branches. Branches let you experiment in a “safe zone” without breaking your main project, while a reset can instantly wipe away mistakes and restore your code to a previous healthy state. By staying disciplined with your commits and knowing exactly what you’re sending to your history, you gain the ultimate peace of mind: the freedom to break things knowing you can always fix them.
Furthermore, don’t be afraid to use that Undo button in VS Code when things are getting ugly. Remember, when you have the right specs in place (more about this later), it only takes couple of prompts to implement that functionality again.

VS Code Agent Skills
A very recent update is the introduction of Agent Skills in VS Code. This feature allows you to essentially “upgrade” your AI assistant by giving it specific tools and specialized knowledge tailored to your unique workflow. Currently, it is still in the experimental preview phase. I’m keeping a close eye on its development, and as soon as it moves into a stable release, I plan to dive in fully to see if it can streamline my daily coding tasks.
A note on picking LLM Models in VS Code
Right now, my go-to model is Claude Haiku 4.5. Because it only counts as 0.33x usage on the Pro plan, it’s an incredibly cost-effective way to handle a high volume of work.
My best advice? Choose a model that fits your budget, but don’t be loyal to a fault. If one model gets stuck or starts delivering mediocre results, swap it out. Don’t get trapped in an endless loop of asking the same AI to fix its own mistakes — sometimes a fresh perspective from a different model is all you need to break the cycle.
Spec Driven Specifications
Introduction
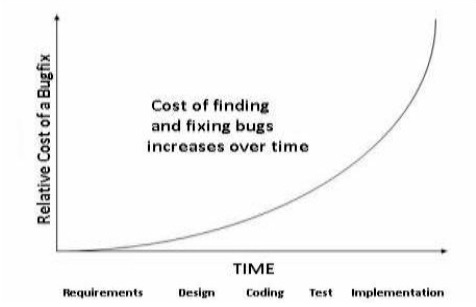
In the world of analysis, requirements engineering isn’t just the first step — it’s the most important one. The math is simple: finding a bug during the design phase might cost you a few minutes of rewriting a document, but finding that same bug in production can cost 100 times more in lost revenue and emergency fixes.
To keep things efficient, I always start by gathering the requirements of a system. Then I feed these high-level specs into a reasoning-capable model to generate a detailed project plan. This breaks the implementation into logical, bite-sized tasks. Since I primarily work with Django, I follow a specific “bottom-up” order that mirrors the framework’s MVT (Model-View-Template) structure:
- The Model: I define the data architecture first. A solid model must be flexible enough to handle future requirements without a total database migration.
- The Template (UI): I move to the front-end next to visualize how the data will actually be used.
- The View (Logic): Finally, I “glue” them together by adding the business logic.
This “spec-driven” approach is a game-changer. By using tools like the GitHub Spec Kit, I can hand off tiny, well-defined tasks to cheaper models like Claude Haiku. Because the task is so specific and the context is clear, the “budget” AI can implement and test the code almost as well as a more expensive model. Looking ahead to 2026, I’m planning to experiment with specs.md to see if it can further automate this “spec-to-code” pipeline.
How I currently use Github’s Spec Kit
I use a five-step process that ensures the AI never has to guess what I want.
Step 0: The Setup
I initiate the toolkit using uvx directly in my project.
uvx — from git+https://github.com/github/spec-kit.git specify init
This scaffolds the .github/prompts and .specify folders, turning my AI assistant into a specialized architect.
Step 1: The Constitution
Command: /speckit.constitution
Output: .specify/memory/constitution.md
This is where I define the “laws” of the project — my tech stack (Django), coding standards, and non-negotiable libraries. This creates constitution.md, which the AI references for every future task.
Step 2 & 2.5: Specify & Clarify
Command: /speckit.specify and /speckit.clarify
Output: specs.md
I describe the new feature. The tool generates specs.md, but I don’t stop there. I use /speckit.clarify to let the AI ask me questions. This catches edge cases — like how to handle a specific error or user permission — before they become bugs.
Step 3: The Plan
Command: /speckit.plan
Output: plan.md
Once the “what” is clear, we move to the “how.” The /speckit.plan command generates a technical blueprint (plan.md) including data models and architecture decisions.
Step 4 & 4.5: Tasks & Analysis
Command: /speckit.tasks and /speckit.analyze
Output: tasks.md
The plan is broken down into tasks (tasks.md). Crucially, I run /speckit.analyze here to ensure there are no conflicting instructions between my plan and the project’s constitution.
Step 5: Implement
Command: /speckit.implement
Output: Well…the code!
Finally, I hand off these bite-sized, verified tasks to the AI. Because the instructions are so precise, even a “lighter” model like Claude Haiku can execute them with high accuracy.
By the time I hit the implementation phase, the “mental heavy lifting” is already done. This doesn’t just make the coding faster; it makes it verifiable. I’m no longer just asking an AI to “build a feature” — I’m asking it to execute a specific, pre-approved plan.
Project Implementation
When it comes to the final implementation, I don’t believe in a one-size-fits-all approach. Even with a perfect set of tasks generated by the Spec Kit, the “right” tool for the job depends on the complexity and scale of the feature. I currently rotate between three distinct strategies:
1 The Direct Approach
For standard features where I want to stay strictly within the VS Code environment, I use the built-in implementation command /speckit.implement. It’s seamless and keeps the context of my project’s “Constitution” front and center.
2 The “Power” Approach (Antigravity IDE)
When I’m tackling heavy architectural changes or complex refactoring, I move the tasks over to Antigravity. This agent-first IDE is a fork of VS Code that provides a dedicated “Mission Control” for AI agents. The big draw here is the access to top-tier models like Gemini 3 and Claude Opus — often with generous free tiers or rate limits that allow for deep, long-context reasoning that a standard chatbot might struggle with.
3 The “Asynchronous” Approach (Google Jules)
For smaller, self-contained tasks like writing unit tests or bumping dependencies, I delegate to Jules. Because Jules operates as an asynchronous agent in a secure cloud VM, I can simply hand off the task and keep working on something else. It clones the repo, fixes the issue, and pings me when the Pull Request is ready.
Each of these tools has its own strengths: Spec Kit provides the structure, Antigravity provides the raw “brain power” for difficult logic, and Jules provides the autonomy for grunt work. By matching the tool to the task, I can maintain a high velocity without burning through my API quotas.
Testing, Testing, Testing
Let’s talk about the most “boring” phase of a project that is actually the most critical: testing. Whether your code is written by a human or an AI, the quality of the final product isn’t determined by who wrote it, but by the quality gates it has to pass before reaching production. In my workflow, I treat AI-generated code with the same healthy skepticism as a junior developer’s first PR.
To ensure the system is production-ready, I implement a tiered testing strategy:
- Unit Tests for Everything: I start at the molecular level. Every function and logic block gets a unit test to ensure it does exactly what it’s supposed to do in isolation.
- Smoke Tests: These are my “sanity checks.” Immediately after a build, I run a quick suite of tests to verify that the most vital functions — like logging in or database connectivity — aren’t literally “on fire.”
- End-to-End (E2E) with Playwright: This is where I simulate real user behavior. Using Playwright, I automate entire journeys through the UI to ensure that the Model, View, and Template are all shaking hands correctly.
- The “Never Again” Rule: My favorite rule is that for every bug I resolve, a regression test is introduced. This ensures that once a “ghost in the machine” is busted, it can never haunt the codebase again.
By setting up these quality gates, I can ship with confidence. The goal isn’t just to find bugs; it’s to create a system where the AI (and me!) can move fast without breaking things.
Conclusion: The Balance Between Vibes and Software Development
As we navigate 2026, the term “vibe coding” might suggest a carefree, almost accidental way of building software, but for the modern Analyst, the reality is quite the opposite. By combining the creative speed of AI with a rigorous, spec-driven foundation, we aren’t just prompting — we are orchestrating. The secret to thriving in this era isn’t finding the one “perfect” model; it’s about building a robust system of quality gates, from the initial Constitution to the final Playwright test.
Whether I’m using the raw power of Antigravity, the autonomy of Jules, or the structured discipline of Spec Kit, my focus remains on the requirements.
In 2026, I’m coding less by hand, but I’m engineering more by intent. After all, when you have a safe way to go back in time and a solid plan for the future, the only thing left to do is build.
0 Comments
No comments yet. Be the first to start the conversation!
Leave a Response